MLFlow Part — 1: Setting up and using mlflow to track your ML experiments locally
Tracking machine learning experiments is crucial when you have a big team of ML Engineers and Data Scientists working on developing and deploying an ML solution. MLFlow is a platform for managing the end-to-end machine learning lifecycle provided by data bricks to help you in model versioning, tracking machine learning experiments, packaging them, stage transition, etc. In this first part of mlflow series in I will be showing you how to set up mlflow in your local system, how to track a simple machine-learning experiment, and save your model artifacts locally in your system.

I suggest you install the mlflow and flask libraries in your system, flask will be used to run MLFlow UI so make sure you also have these in your system.
pip install mlflow
pip install Flask
Before getting started please understand that his article is focused on showing you how to set up and track ML experiments and not data analysis, optimizing for the accuracy of the model.
Alright! Let’s set up our data and build a basic model. The code and the data used in this article can be found towards the end.
After importing the data it should look something like this.

Let’s understand our data here, our target here is Segmentation which has 4 categories (A, B, C, D) thus, we have a multi-class classification problem at our hand. Next, we know that ID column won’t contribute much in classifying hence we will drop it. Also, we need to encode our target variable and also the other categorical variables (Gender, Ever_Married, Graduated, Spending_score) in order to use it in building the ML model so we are going to do that as well. All this is done in the code below.
#drop the unnecessary columns
df = df.drop(columns=['ID'])


# encoding target variable
target_mapping = {"A": 0, "B": 1, "C": 2, "D": 3}
df['Segmentation'] = df['Segmentation'].map(target_mapping)


#oneHot encode categorical columns
one_hot_df = pd.get_dummies(df, columns = ['Gender','Ever_Married','Graduated','Spending_Score']
                            ,drop_first=True)
Now let’s create the model, fit the data, get the predictions and calculate the accuracy.
from sklearn.ensemble import RandomForestClassifier
from sklearn.metrics import accuracy_score
from sklearn.model_selection import train_test_split

X = one_hot_df.drop(['Segmentation'], axis=1)
y = one_hot_df['Segmentation']

#split the data
X_train, X_test, y_train, y_test = train_test_split(X, y, test_size = 0.30)

#parameters for the model
max_depth = 5
n_estimators = 100

# create the model and fit the data
rf = RandomForestClassifier(n_estimators= n_estimators, max_depth= max_depth)
rf.fit(X_train,y_train)

# get the predictions and find the accuracy
y_pred = rf.predict(X_test)
acc = round(accuracy_score(y_test,y_pred),2)
Next, we will import and use MLFlow to track this ML experiment that we just created. Firstly, we will be setting our experiment name under which the artifacts will be tracked and the tarcking_uri which tells mlflow where to register the model and store model artifacts. We start the mlflow run to begin logging moving ahead to log the parameters we use mlflow.log_param, to log metrics we use mlflow.log_metric and to save the model we use mlflow.sklearn.log_model.
import mlflow
import mlflow.sklearn

mlflow.set_experiment("Classification_Task")
mlflow.set_tracking_uri("http://127.0.0.1:5000")

with mlflow.start_run(run_name="RandomForest_Classifier"):
    mlflow.log_param("max_depth",max_depth)
    mlflow.log_param("n_estimators",n_estimators)

    mlflow.log_metric("Accuracy", acc)
    mlflow.sklearn.log_model(rf, "RandomForest Classifier")
    print("Logging Complete")
After running this you need to open Command Prompt/Anaconda Prompt and traverse to the folder where you want to store the artifacts locally in your device and run MLFlow UI which will create a folder in your local directly called mlruns where it will store all the model artifacts. In my case, it is Anaconda prompt because I used Anaconda to install mlflow in my system.

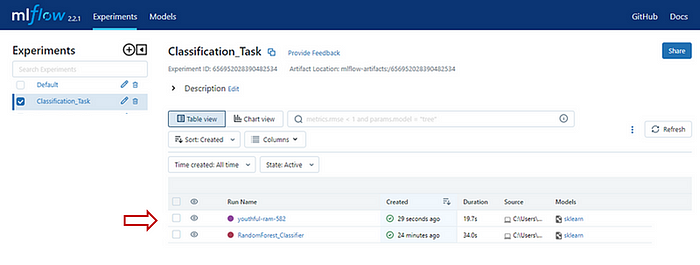
After you see a similar screen, copy the address http://127.0.0.1:5000 and paste it into your browser, you should see two folders, one is default which is already present and the other is Classification_Task which we just created for tracking our Random Forest model.

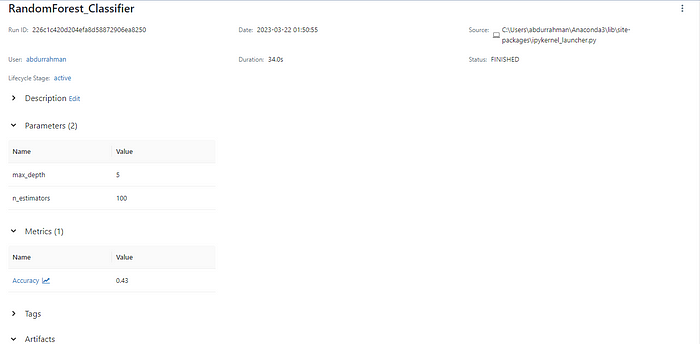
If you click on the Classification_Task you will be taken inside where you can see your Random forest model again go ahead and click on it and you will see something like this. You can click on the drop-downs to see your logged parameters, metrics, and model.

Under the Artifacts section, you can find your model it is also available for you in the pickle format with the requirements, yaml, and environment files so that if you want to take this model to production you can easily do so.
MLFlow provides a way to auto-log everything without specifying logging separately for each metric and parameter, using this we can log other things as well automatically. Here is an example of how you can use auto-log.
params= {"max_depth":5,
         "n_estimators":100
        }

mlflow.sklearn.autolog()
with mlflow.start_run() :
    rf = RandomForestClassifier(**params)
    rf.fit(X_train,y_train)
    y_pred = rf.predict(X_test)
    acc = round(accuracy_score(y_test,y_pred),2)

    print("Logging Complete")
If you go to your mlflow UI and check there will be one more run with a random run name under which various parameters and metrics will be logged, all these things are detected and logged automatically by mlflow for you.

You can also interact with the MLFlow server. You can list all the runs in an experiment and print them into a data frame with all the information in each run. Just use the following code to get the data frame.
mlflow.search_runs(experiment_names=["Classification_Task"]By now you must have an elementary understanding of how you can use MLFlow to track your ML experiments locally in your system. There is a lot we can do with MLFlow, if you are interested you can go through their documentation here. There are various methods provided to make tracking and serving models easier.
Thank you for reading the article. If you found this useful feel free to share. You can connect with me on LinkedIn to discuss more on Data Science, MLOps or in case you have any questions. The code and the dataset used in this article can be found here.
